Monday, September 16, 2019

WINTER WHIMSY SNOWFLAKE QUILT ❄️ ❄️ ❄️

The WINTER WHIMSY SNOWFLAKE quilt is made from a series of flannel fabrics designed by Shelly Comiskey for Henry Glass.  I made this quilt for my brother and his wife.  They live on the very top of Beech Mountain in North Carolina and celebrate Christmas all year long.  My sister-in-law mentioned that she would like a snowflake quilt so when I found these fun flannel snowflake fabrics I just couldn't resist getting them!


I've never sewn with flannel before, but it's surprisingly easy to work with.  Flannel has a brushed surface with a nap to it. When I pressed my piecing I would first lay down another piece of flannel right side up on my ironing board and then lay my fabric right side down to that, pressing nap to nap.  This preserves the loft of the brushed surface of the flannel.


I didn't have a pattern for this quilt.  Basically, I just put sashing and squares around the gnome panel.  Once these joyful little gnomes were stitched together I loaded them onto my longarm.  


This quilt has a fun flannel backing filled with frolicking gnomes.  The backing is cute all on its own!


I used  Warm and Natural Cotton Batting for this quilt.  I used MicroQuilter #7007 - Silver thread for the top and in the bobbin I used So Fine #401 - White.  I used a stitch length of 8 and I played around with the machine speed because the sewhead seemed to drag a bit with the heavier flannel.  


I used a 3.5 tension and a 180 TOWA tension for the bobbin.  I started with an 80/12 Topstitch needle but I was getting skipped stitches now and then.  Again, the flannel top and bottom made this heavier to sew through so I switched out to a larger Titanium 90/14 Topstitch needle from Superior Threads and that seemed to solve the problem.


When it was all done I made binding in a red and white striped flannel and sewed that all the way around.  I had one of those dreaded moments that quilters have when I realized I was just short of the fabric I needed to finish the binding.  Etsy to the rescue!  I ordered a fat quarter and finished it up!


It was the cutest little binding ever!  Here is it on the Binding Baby. Binding Baby's are used to roll up the long binding and keep it off the floor and out of the way as you stitch it to the quilt top.


I'm still wearing a brace on my hand.  I have a sturdier one that I wear around the house but when I quilt I take that one off and use this one with the flexible thumb.  I'm also still using the Palm Precision Handles without using the red side button in order to not use my thumb at all. Hopefully, my thumb will get better soon.


I just love the little gnomes on this snowflake quilt!  We have a little gnome in our garage named Pukii.  Pukii's job is to keep the coyotes out of the garage! He was nice enough to pose with the quilt!


This is a great little quilt to snuggle with.  I hope my brother and his wife like it and share it with their grandson when he comes to visit them!  


Remember to pick up a needle and thread and stitch some love into your world❣️

Friday, September 13, 2019

WEAVE IT BE QUILT ✨ ✨✨

The WEAVE IT BE QUILT is pieced together in ombre fabrics in all the colors of the rainbow.  It was designed by Callie Works-Leary.  


I had a hard time choosing a quilt for my great nephew who will be turning twelve.  He's too big for the cartoon quilts with Minions or Paw Patrol characters on them but still young enough that I wanted to make something just a little playful.  Then I remembered how he lit up his bedroom for Christmas with the coolest light display ever and so I picked this quilt with its fun pattern that weaves bright and bold colors together to create a unique illusion of sparkling light.  Plus this pattern has yet another illusion ... when all those squares and rectangles are sewn together they appear to be woven strips of fabric when they're actually not.  My great nephew also loves magic so I'm hoping he'll appreciate the illusion woven into his quilt.

For this quilt you need what is called a Jelly Roll of fabric strips.  I used a Boundless Ombre Jelly Roll. I have never worked with a Jelly Roll before.  I thought the reason they made Jelly Rolls was because the strips were precisely cut into two and a half inch strips.  Ummmm ... this jelly roll ... not so much.  I'm used to cutting my own strips and I just couldn't get that perfect quarter inch seam using these at all.  After I was done I read an article online where someone else had the same problem and they suggested trimming each one before using.  Well, live and learn.  I didn't get those perfect quarter inch seams so all the piecing was off which then made it more difficult to work with this on the longarm.  This quilt was most definitely what we call in the south a "hot mess" when it comes to precision. 


Once you open up the Jelly Roll you take the strips and cut them into smaller strips, rectangles and squares.  You'll end up with a rainbow of 331 pieces for your quilt top.


Then you sew three strips together.  You'll do this 36 times.  


Then you take each strip set and cut it up into four smaller strips. You'll end up with 144 of these.


Then you assemble them together like the picture below and sew them together.  It's like a little puzzle.  You make 36 of these.  Once sewn together they appear to be woven in and out.


Then you sew together your 36 blocks and put on four borders and your quilt top is all pieced!


Then comes the fun part!  You load it onto the longarm with your batting and your backing.  For the first time I'm using black batting.  It's Quilter's Dream Polyester Black Batting.  


This is a busy quilt so I didn't want to do too much in the way of fussy quilting to distract the eye.  Instead I wanted to add to that illusion of weaving so I stitched in the ditch around the woven strips of color and then in the black spaces in between them I sewed lines 1/4 inch apart to flatten the quilt around the strips and make them pop. 


For the border I quilted a woven pattern which worked perfectly around the quilt.  But when I took this quilt off the longarm and laid it out I just wasn't happy with the stripes not having any quilting in them so I put the quilt back on the longarm and quilted X's in each square which made diamond shapes when put together.  With the graduation of colors in the ombre fabric these little diamonds almost look like their twinkling.


I used Aurifil Monofilament thread for the top and Glide thread in black in the bobbin. Monofilament thread is like fine fishing line so I dropped the tension to .75 and the stitch length to 8.  When I started quilting I set the machine speed to 220 and worked back up to a normal 250 as I warmed up.  I used a BERNINA 80/12 Topstitch needle.  


Palm Precision Handle on right and normal handle on left.


I also quilted this quilt with my hand in a brace.  I use the toggle on/off switch repeatedly which is on the end of the handle and I ended up with a messed up thumb.  Halfway through I switched over to the Palm Precision Handles.  These handles were designed by Hans Herzog to be used for small free motion quilting such as stippling or for quilter's with arthritis.  I was able to sew with one of these (I only use one hand to quilt with) without using the red side button and therefore didn't have to use my thumb.  This allowed me to still quilt while giving my thumb a break. The Precision Handles weren't really made to be used for ruler work, which is what I was doing on this quilt. There are times when the ruler stretches underneath the handle and you can't get a good placement.  And there are times when you need to reach around and can't because the handle is in the way.  But other than that this handle worked beautifully and will be my go to until my thumb heals up.  


I hope my great nephew loves his quilt!  Remember to pick up a needle and thread and stitch some love into your world❣️


Sunday, September 8, 2019

THE IRIDESCENCE SPECTRUM QUILT ✨ ✨ ✨

The Iridescence Spectrum Quilt is a fun, modern quilt designed by Laura Piland of Slice of Pi Quilts.  My husband picked out this pattern for me to make as a wedding quilt for his niece, Kelly.


This quilt is made up entirely of half square triangles and squares. There are 980 pieces in the quilt top and it's made from 23 different colors.  I used a fat quarter bundle of Boundless Solids.  Fat quarter bundles always look so pretty just sitting there all tied up in their ribbon. You almost hate to open them up. And I always love the names of the fabrics.  These are called, Sunshine, Butter, Saffron, Deep Sea, Mint, Blue Lagoon, Scuba, Jewel, Caribbean, Aquarius, Azure, Purple, Lavender, Mulberry, Flamingo, Hot Pink, Cherry, Boysenberry, Sherbert, Melon and Fog.


Fat quarter bundles are always so pretty!

And since this quilt is made up of so many 2 1/2 inch square triangles I bought a 2 1/2 X 2 1/2 inch square quilting ruler by Omnigrid to square each one up.  It's my tiniest ruler yet.  I have to say it's kind of adorable!


Omnigrid 2 1/2 X 2 1/2 ruler.


First I cut up my fabric into 980 pieces and laid them out by color. There are 2/1/2 X 2 1/2 inch pieces and 3 X 3 inch pieces.

980 pieces of fabric.

Then I sewed the 3 inch pieces together into half square triangles (HST) and then cut them down and squared them off into 2 1/2 inches with my adorable new ruler.


Half Square Triangles (HST) all done.

After a week of chain piecing the fabric squares and then stitching all eighteen blocks together I finally finished the quilt top!


Chain piecing the fabric squares.

I rearranged the bottom row of the quilt top from what the pattern called for because the lavender square was at the end of the row and just seem to fade off so I put it in the middle.


Then I loaded it onto the longarm.  This is always my favorite part of quilting.  In fact, sometimes, I kind of resent having to spend all that time making the quilt because I'd rather be on the longarm than the sewing machine.  


I loaded my quilt top onto the longarm but instead of rolling it onto the bar I floated it this time. I also measured differently this time using the bottom leader with pins in it for my guide and flipping it up and rolling it down along the sides to square up as I went. This actually works quite well!


I quilted the entire quilt using two of my BERNINA rulers ... the straight ruler and the largest oblong ruler.  I used the oblong ruler in the middle of the squares and the straight ruler for the rest of the quilt.


I normally use Quilter's Dream batting but I've been wanting to try out a silk batting so I bought some Hobbs Tuscany Collection Silk Blend. This is a blend of silk and fine polyester and it is supposed to breathe naturally and be great for all climates.  It also claims to have an amazing drape even when heavily stitched.  


I used Micro Quilter #7007 - Silver thread on the top and Bottom Line #623 - Silver in the bobbin.  The tension was at 3.5 and the bobbin tension on the TOWA was 180.  Even though Micro Quilter recommends a 70/10 needle I used a 90/14 Jeans needle for all those thick intersecting seams.  I also slowed down my machine speed a bit to 230.  


My husband picked out this pattern for his niece because it reminded him of her ... bold, bright and beautiful! I hope Kelly enjoys her quilt.  It was stitched with love!  And I wish her all things bright and beautiful❣️


Remember to pick up a needle and thread and sew some love into your world ❣️


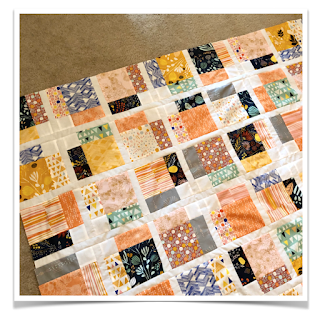
THE DISAPPEARING NINE - PATCH QUILT 🌼 🌼 🌼

This Disappearing Nine-Patch Quilt was featured in Modern Patchwork Magazine.  It was designed by Lisa Swenson Ruble.  I made this quilt for my great-niece, Karli.  


I have made this quilt before for my nephew's wedding with one big difference ... I quilted his quilt at my local quilt shop using their longarm and Q-Matic computer.  Since then, I have gotten my own longarm, although without the Q-Matic computer.  I honestly just love the art of quilting and doing it myself, not relying on a computer to do it for me. So, this time around I quilted this pattern myself.  

The trick to a disappearing nine-patch is to stitch three rows of three squares into a block.  This is called a nine patch.  Then you cut that block into four equal squares leaving you with something completely different than what you started with.  This is why they say the nine patch disappears. It adds a little twist to one of the quilt world's most basic blocks.

This quilt starts with 190 five inch blocks. This fabric line is called Morning Walk and is designed by Leah Duncan for Art Gallery Fabrics.


First you sew nine fabric squares together to make a nine patch block. And then you cut that square into quarters.


Then you take those quarters and randomly arrange them.  I did this with all twenty squares.  Then I added sashing in between the quarters to create ten rows. 


I added sashing between the ten rows and then sewed on the four borders to complete the quilt top.  


A word about random placement.  I never do things completely randomly even when a pattern calls for random placement. What I do is to try to locate the stand out colors and make sure that they get represented in all parts of the quilt top.  I think that this is more pleasing to the eye.  And I make sure that no color is next to itself.  Just that little bit of interference makes a nice difference. 


Once the quilt top was together I loaded it on the longarm.  I floated the quilt top instead of rolling the top onto the bar.  I used my Grace Company Quilt Clips to give the top some tension as I quilted it.  


Do you know what I do?  I take large pieces of fabric, cut them into tiny pieces of fabric and then stitch them back together into a large piece of fabric.  Hmmmm.  Sounds counterproductive, right?  But actually it's a little bit of magic ... 


I hope Karli enjoys her quilt!  Remember to pick up a needle and thread and sew some love into your world ❣️