Friday, July 23, 2021

DIVIDED BLOOMS QUILT 🌸

The Divided Blooms Quilt is one of my favorite quilts.  The pattern is by Carolyn Murfitt of Freebird Quilting in Australia.  Carolyn is a longarm quilter so she designed this pattern with lots of negative space in it so that there is lots of room to do free motion quilting.  


I hand appliquéd all of the petals and then pieced the quilt together.  


While I did all of the appliqué I binge watched all nine seasons of How I Met Your Mother on Amazon.  Then I put it on the longarm to quilt. All in all it took me almost three months to make this. 


When I started to quilt I found that I couldn't free motion quilt any more.  All of my muscle memory was gone.  I had just had brain surgery where they removed a tumor from my head and something must have messed with my brain.  Everything looked liked the first time I had ever tried to quilt.  I sat down and cried.  Especially since I had saved this quilt to do until now when I would be a more accomplished quilter because I wanted it to be perfect for my niece. 
Finally, I just decided that I had learned it once and I could learn it again, so I went out and bought yards of cheap fabric and practiced. 
I finally put the quilt back on and went ahead.


I used Quilter's Dream Wool Batting so that when I quilted in the ditch around the petals they would pop out.

I used Isacord 40 weight thread.  #02922 Muslin on the top and Glide #38201 Steel Blue in the bobbin.  I used a Schmetz Topstitch 90/14 needle.  


I cut the borders larger than the pattern required.  I cut them at 3.5 inches which left a 3" border after stitching.  This gave me room to FMQ my signature leaves around the border.  I did the top and bottom border and then took the quilt off the frame and turned it ninety degrees so that I could do the side borders.


I got this quilt done the day before we left for up north.  My sister and her husband were celebrating their 50'th Wedding Anniversary and this quilt was for their daughter.  


Remember to pick up a needle and thread and stitch some love into your world❣️


My Master Quilt Holder at work.


The Winter Village Quilt

The Winter Village Quilt is a pattern by Edyta Sitar of Laundry Basket Quilts. This quilt features  a little village with bluebirds in the foreground sitting on branches with berries. The original pattern also includes snowflakes but I did not use them.  I wanted it to be an all season quilt.


I am making a quilt for everyone in my family.  I try to match the quilt with the individual.  My first niece, who is also my first godbaby, is a hugely successful realtor so when I saw this quilt with all of its different houses I thought I'd make it for her home office and then make her another quilt for her living room space.  


I really took my time with this quilt.  I used Best Press on every inch of the fabric, matched the corners to perfection and squared everything off.  Then it came time to do the appliqué.  The kit came with laser appliqués that you iron on and then machine appliqué down.  Instead I ordered the additional"snippets" which are laser cut but with an additional 1/4 inch so that I could hand appliqué them.  When you hand appliqué you turn the fabric under and there is no loose threads or shredding when washing the quilt.  Hand appliquéing takes a very long time to do but I wanted everything perfect.  


Life, however, took a decided turn when I was ready to start appliquéing the birds and branches.  I was admitted to the ER where they found a tumor in my head and told me I would have to have it surgically removed.  I had some time before the surgery but nowhere near enough time to hand appliqué the birds and branches.  I was nervous about the surgery because my care in the ER had been absolutely horrible.  I have had, so far, four calls from different hospital heads to apologize for everything that happened but my experience there made me extremely nervous about my upcoming surgery and I was not feeling good about the outcome.  I wanted this quilt done before I went into the hospital in case something happened.  This meant that I had to use the fusible appliqués that came with the pattern and then machine quilt those on to save time.  The problem with that is that my 47 year old ELNA sewing machine no longer has a zig zag that works well, which I found out while doing this.  It runs beautifully for straight stitching but not so well anymore for zig zagging.  The result was far from perfect but I could only hope it wouldn't be too noticeable once everything was done. 


I did not think I would get the quilt done in time.  I wanted it quilted.  I was not going to worry about the binding because that could always be added.  But I had set myself a formidable task ... I was determined to quilt the background in orange peels.  Tiny little orange peels.  Orange peels that would need to be tucked behind the houses and in between the branches.  You have to be a longarm quilter to understand the complexity of that task. I used my 1.5 inch BERNINA circle ruler and did each orange peel by hand. This took forever but I finished.  I was even able to machine stitch the binding to the front of the quilt, just not hand stitch it to the back.


The tiny 1.5 inch BERNINA circle ruler.


In the photos beneath you can see the difference in the pieced top and the quilted top.  The quilting adds texture and definition.


While making this quilt I took part in the #IGQuiltFest2021 where you post pictures for 31 days on Instagram for different sewing prompts. Also, of note I got my COVID shot.  I received the Johnson & Johnson vaccine that had one dose instead of two.  As I waited at the Veteran's Administration to get the shot I told my husband that if anyone would have told me last year that I would be standing in line at the VA after having had brain surgery to receive a vaccination for a worldwide pandemic I would have called them crazy.  How quickly the world can tip on its side when we least expect it.


I used Quilter's Dream Orient batting for this quilt.  It's made from silk, bamboo and cotton.  The result is a hand that is soft and drapeable.  I used Glide thread in Mercury for the bobbin with a TOWA tension of 200.  And Glide thread in Sky and Linen for the top with a normal tension of 4.0. 

While quilting I was able to let go of my nervousness and fear and instead focus on my blessings ... my family, friends and faith.  

Everything turned out well with my surgery.  I even came home early. My recovery lasts 3 months.  As I sat in a comfy chair I hand stitched the binding a little each day until finally on my tenth day home I finished the quilt. I'm feeling very blessed to be home and to be healthy!  God is Good!


Remember to pick up a needle and thread and stitch some love into your world❣️


My husband and my master quilt holder!


Saturday, February 13, 2021

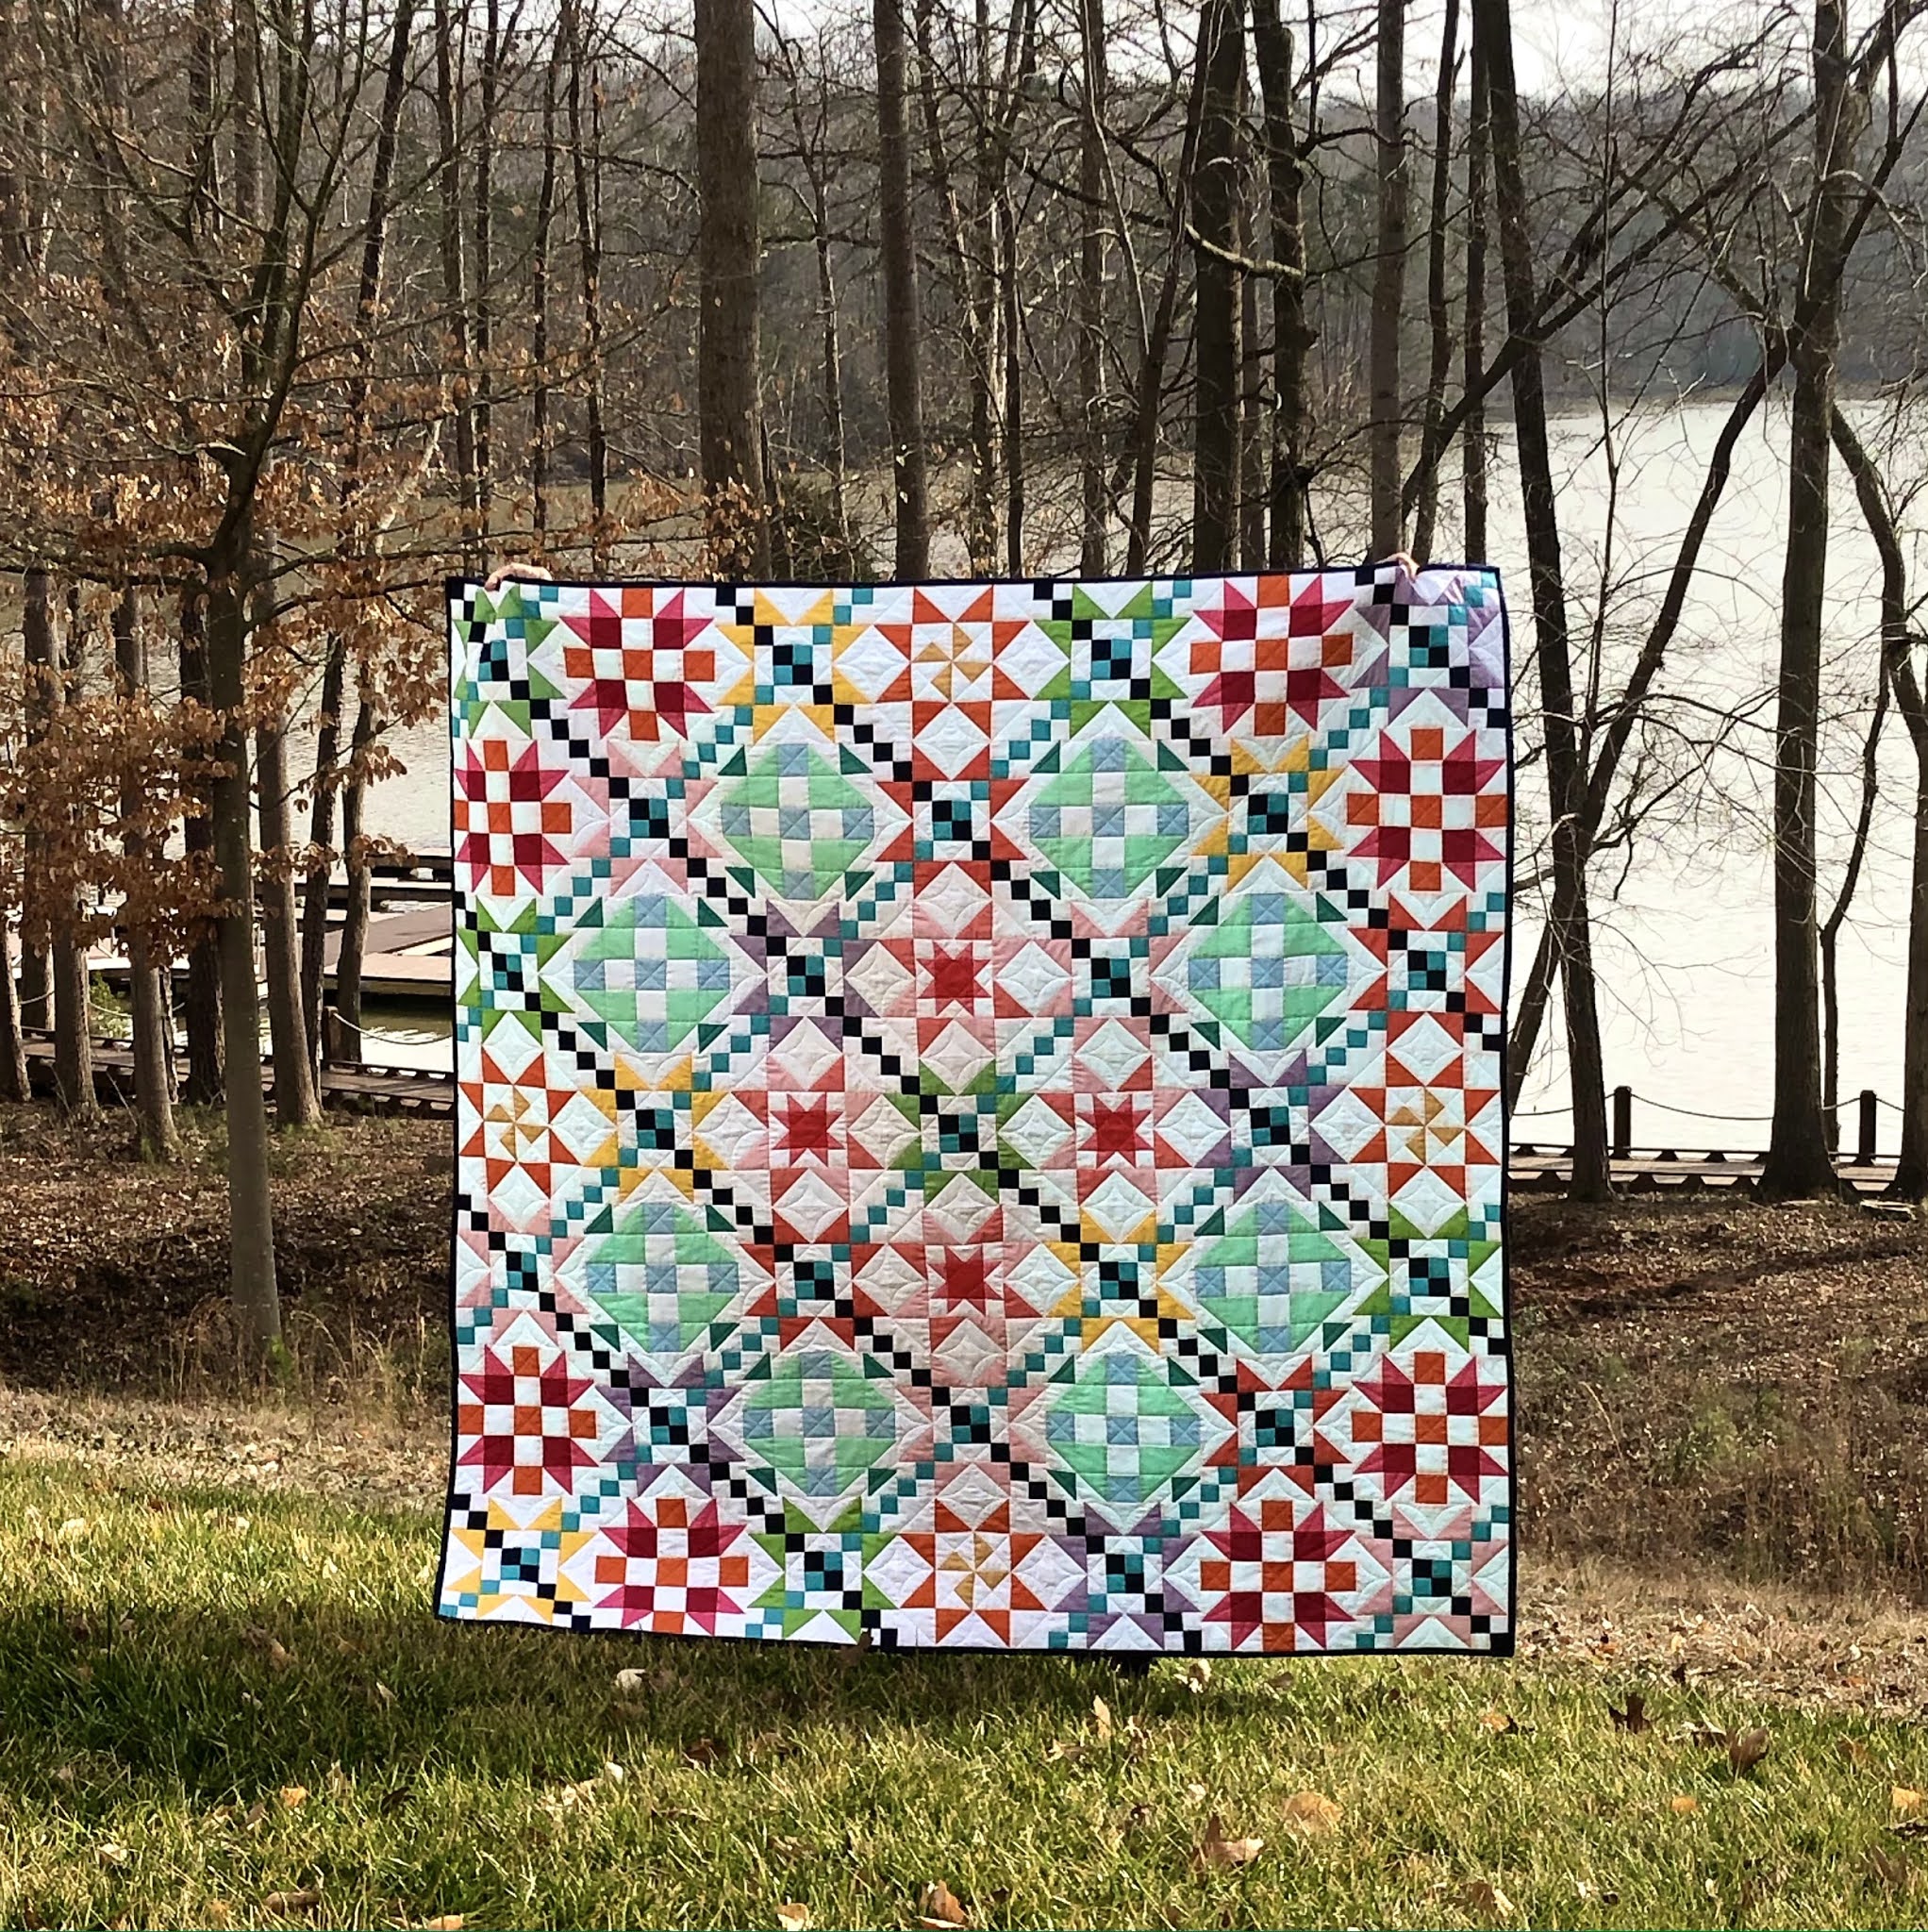
The Maker's Quilt


The Meet The Makers Quilt is a modern quilt that was introduced at the 2018 Quilt Market.  It uses Riley Blake Confetti Cotton Solid Fabrics. It's called Meet The Makers because each block was designed by a different maker and then the blocks were assembled together into a quilt pattern that was offered as a limited edition quilt kit.  This quilt is for my niece, Kari.  


This quilt is 70" X 70".  It's made with 1760 tiny pieces. There are five different blocks in this quilt for a total of 49 blocks altogether.  If you look at the corner blocks, those are called alternating blocks and there are 25 of those.  When stitched together with the other blocks these alternating blocks form irish chains in light and dark blue.  The actual colors are called Navy and Petunia.  

Riley Blake Confetti Cotton Solids are beautifully made.  They have a very nice hand to them.  "Hand" refers to quality of a fabric assessed by feeling the fabric between your fingers and thumb and seeing how soft it is.  The confetti colors in this quilt were ...

White, Navy, Peacock, Grass, Daffodil, Green Smoothie, Lilac, Petunia, Rouge, Orange, Crayola Tickle Me Pink, Cranberry, Sweet Mint, Crayola Blizzard Blue, Vivid, Cayenne, Lipstick, Sugar Pink and Daisy. These fabrics come together to create a beautiful rainbow of colors.  


The alternating block is made using six different color ways.  The cut pieces are shown above. This block is made up of four-patch pieces, strips and flying geese pieces.  Block #1 is made up of squares and half square triangles.  Block #2 is made up of squares and half square triangles. Block #3 is made up of flying geese pieces and squares. And block #4 is made up of flying geese pieces, squares and rectangles.  


Once the 49 blocks were assembled it was time to put it on my longarm.  For this quilt I used Quilter's Dream white polyester batting.  I used white because of all of the white in the quilt top.  Using a cream batting behind white fabric makes it look dingy.  But if you use the white batting it helps to make the quilt top pop.


I used Aurifil monofilament thread for the quilt top and MicroQuilter #7017 for the bobbin.  I turned the tension down to 1.75 and sewed with the bobbin set up 200 TOWA.  I also increased the machine speed since this was mostly stitch in the ditch work.  This was completely quilted by using ruler work.  I used a straight edge and one circle. I also outlined the Irish chains to add a secondary design to the quilt.


This quilt is for my husband's niece.  He is my Master Quilt Holder and he held it up for me to take a picture of it after he went for his COVID shot at the VA.  


Remember to pick up a needle and thread and stitch some love into your world❣️   


The Satellite Quilt

This Satellite Quilt is all about circles and color.  I made this quilt for my great-nephew, Grayson.  It's made out of colorful batik fabrics. 


To make this quilt you group your fabric together in light and dark groups and then sew those groups together into 9 inch square strip sets.  


Then I took a special template to make inset circles and used it to cut out large and small quarter circles, which were then sewn together. Most of the circles on this quilt are made in "pac man" shapes with a quarter missing.  The others are complete circles. 


Once I had all the circles inset into 9 inch squares I sewed them together. Then I made a border using leftover sections of the strip squares.  Once the borders were sewn on I put the quilt on the longarm. 


I used rulers to stitch diagonally across the circles and "pac man" shaped circles.  Then I used circle rulers and just doodled circles all over the quilt to fill the space.  


I used Quilter's Dream batting in polyester. For the backing I found a blue batik fabric with little circles on it to match the batik fabrics used in the quilt top.  I used Aurifil Monofilament thread on the top and a light blue MicroQuilter thread on the bottom.  I would have liked to have used a darker blue thread on the back, but I used what I had on hand here because with COVID numbers rising we don't go out shopping.  


This is one of those quilts where the colors are better seen up close and in person. My "master quilt holder" braved the cold and held it up for a picture outside.  


Make sure to pick up a needle and thread and stitch some love into your world❣️


Friday, February 12, 2021

THE ITTY BITTY BIRDIE QUILT 🐦

This is my itty, bitty, birdie quilt❣️ It was a block of the month wool appliqué quilt. This was my first time doing wool appliqué and I had a ball! Working with hand dyed wool and hand dyed thread is an absolute joy!


Although this is a tiny quilt measuring in at only 24" X 24", this is the most expensive quilt that I've made to date.  Hand dyed wool and hand dyed thread are costly.  

To start with I purchased all of the hand dyed threads that I would need. Then, each month I would get a tiny envelope with tiny bits of wool in it and directions for a new little birdie.  It was always a surprise as we were only shown a black and white outline sketch of the quilt without the borders when we signed up for the Block of the Month.  That meant we had no idea of what the actual quilt would look like when it was done. 


Once I got that month's package I would get to work cutting out the wool and whip stitching it to the background piece.  Then came the fun part ... embellishing it with all sorts of stitches.  The embellishing is what takes the birds from flat to three dimensional.


You can see in these photos that there is quite a difference before and after the birds are embellished. 


The lavender bird below is one of my favorites.  It's just so silly!


There were nine little birds altogether.  One month a rather plain little bird pattern arrived and so I stitched it differently and made it my own.  I also decided to put him in the middle of my quilt and not use the arrangement that we were given.  This little bird took his time showing up in my mailbox.  I thought he was lost for sure.  It turned out that the post office had held it because there was a hurricane off the coast of North Carolina.  I'm in Charlotte, which is inland, and we only got a quick shower of raindrops and nothing more but the post office held it anyway.  We did, however, get an earthquake while I was doing this birdie.  It was a 5.1 at its center and the strongest quake here in North Carolina in 104 years.  In our eleven years here it was our second one.   


At one point, while waiting for the next month's little bird to arrive,  I tried making my own pattern and stitching a hedgehog.  I would like to design my own quilt someday.  I'd love to make a tree of life in the middle and use the hedgehogs in the borders with hearts in between them.  


For month #10 and 11 the borders arrived in the mail.  They sent two different green wools as the background for the borders, but it was a shade of green I didn't care for at all against the blue backgrounds of the birds.  I made the borders anyway, but was kind of on the fence whether or not to send away for another color of wool and just design my own borders, because I really didn't care for what was sent. I finally decided to keep it as it was since the wool is so expensive and I had worked really hard on the borders.


Then I put the tiny quilt on my longarm.  Once I stitched around the birds they really popped up fat and fluffy! I stitched little sticks with leaves on them and some flowers then pebbled around them.  


Remember to pick up a needle and thread and stitch some love into your world❣️


Friday, December 25, 2020

THE DACHSHUND QUILT ❤️

This adorable dachshund quilt is called All Wrapped Up and features Woof Woof Meow Meow fabric from Moda by Stacy Iest Hsu. Since the pattern is from 2017 the coordinating fabric line is no longer available for purchase.  I had my heart set on all those little doxies though so I searched high and low on the internet and found each little piece that I needed. Since I had to buy a quarter yard of each I had plenty of room for fussy cutting so that I could get the little dachshunds in the rectangles.  


This quilt is a Christmas present for my son and his wife's three little dachshunds ... Tesla Firefly, Tiberius (Ti-Bear) and Puppy Odin.

I had seen this quilt hanging at my favorite quilt store with an all over paw print design on it. They had used their Q-Matic computer to stitch it out.  I don't have a computer or a pantograph because I enjoy the art of quilting, in other words, doing it myself.  This was the one time, however, that I would have liked to have had the computer ... those little paw prints were seriously cute.  I thought of free motioning them all across the quilt but instead I used straight line quilting around the dachshund body and then ruler work inside the body.  I did, however, free motion one little paw print into the bottom corner.


This pattern also did not include an eye for the puppy.  I thought that looked a little weird so I appliquéd an eye on using some matching fabric then embroidered around it. I think that really added to it.


Although I won't post this blog until after the puppies get this quilt for Christmas, I finished this quilt in August.  This was the 30'th quilt that I finished on my Bernina longarm.  Which is sort of fitting, because the very first quilt I made on my longarm was for the puppies too!


Piecing the quilt was a breeze ...


Below you can see the difference between a pieced top and a quilted top.  The quilting gives it texture and dimension.


Once I was done piecing the quilt I put it on my longarm, which is my favorite part of the quilting process.


For this quilt I used Quilter's Dream Wool batting to achieve that loft and softness.  I used Isacord thread top and bottom on the background.  And for stitching in the ditch I used MicroQuilter on the top and So Fine in the bobbin.  

I watched the last season of the original Star Trek series while piecing the top and then while quilting it on my longarm. When it came time to bind the quilt I started watching Star Trek - The Next Generation and fell in love with Jean Luc Picard.

My Master Quilt Holder at work!

I hope the puppies enjoy their Christmas present❣️ Remember to pick up a needle and thread and stitch some love into your world❣️


A matching blanket for their puppy crate!