Monday, April 6, 2020

THE BRUSH STROKES QUILT 🔷 🔷 🔷

This Brush Strokes quilt is for my niece, Molly 💙 This is for her college graduation.  


I have made this Brush Strokes Quilt before.  You can read about it in an earlier blog.  Molly actually saw the first one as an unfinished quilt top laying across my guest bed when she came to visit once.  What she didn't know was that I had all the fabric to make another one tucked away in a drawer for when she graduated.  At the time both Molly and my son were learning how to speak and read Japanese.  Although these brush strokes look nothing like Japanese scripts they still kinda gave me that vibe, which is why I chose it for Molly.

This quilt came together quickly, having already made one.  I stopped part way through, however, to join the Giucy Giuce/Alison Glass Mini Series SAL (Sew Along) on Instagram.  I actually won the very first prize in the challenge.  Here is the announcement from Alison Glass that I won ...


And here is my thank you post on Instagram ...


And here is my Instagram post for my practice square.  I should mention that Alison Glass is the fabric and pattern designer for the Spectrum quilt that I made for my son and his wife and that Giucy Giuce is the designer of the aLiEn fabric that I used in my brother's quilt.  This is why the aLiEns are pictured in the above post and referenced in the post below.  


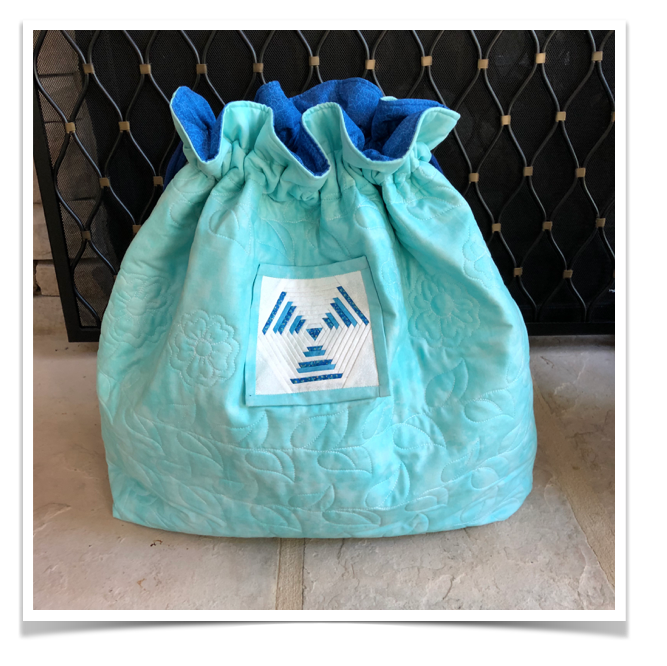
This was a ten week challenge.  You had eight patterns to make and you made one a week and then the last two weeks you picked a project to sew them into. I chose to make a matching drawstring bag for Molly's quilt.  

Here are some of the squares as I made them.  These are four inch squares.  They're very tiny.  Some of them have over a hundred pieces of fabric in them.  They are all paper pieced. 


During this time the Coronavirus made its appearance in the United States.  The severity of this pandemic was brought home very quickly to us when our son's coworker came back sick from a business trip to the West coast and tried to get tested and there weren't any available testing kits.  Then my son, whose desk is next to his,  got a cough and fever but was also unable to get tested, although he was soon fine. My husband and I had bought enough food and supplies to self quarantine and my son brought us more when we ran out. We watched as so many people didn't listen and just kept going out to places that they didn't need to go to. As I sat home sewing I was reminded of my Mom who made baby quilts for all of us.  She would put a letter in each one that journaled what was going on in the world around her as she sat there cross-stitching.  I remember reading the letter that she had put in with one of the quilts that told of the events of 911. That letter is now a piece of history. And now here I sit making a quilt and writing about the Coronavirus that's affecting the entire world.  I hope we can come out of this stronger and kinder.  

As the pandemic grew, I made Molly's quilt.  I made it differently than the first one that I made.  I covered the entire quilt in orange peels using a small circle ruler.  There are approximately 720 orange peels in the twenty squares that make up the quilt.The hard part is that I tucked them behind the brush strokes. The harder part was that I ran out of my quilter's marking pen which I couldn't replace.  That meant I couldn't mark it properly and had to eyeball most of it which led to some wonky orange peels.  I guess that's just part of the quilts' history though.  As I finished the quilt I finally got replacement markers from England, the only place online that I could find them.


The small circle ruler used to make the orange peels with.

For this quilt I used Aurfil Monofilament thread and Glide White thread for the borders.  For the Monofilament my top tension was dropped to 1.25 and the bobbin tension was set at TOWA 200.  I used Quilter's Dream Polyester Batting in white because the quilt top is mostly white.  


I made the border larger than the pattern calls for and free motion quilted leaves around it.  I also put the material for the drawstring bag on the longarm and quilted matching leaves and flowers onto it.  


For the drawstring bag I used up the leftover batting and backing from longarming the quilt.  There were very few colorful scraps left from piecing together the quilt top.  That's why I thought to use the paper piecing challenge to use up the tiny scraps.  For the challenge I made eight four inch paper pieced squares.  There are five on the front of the bag, one flanged onto the back and two inside for pockets.  I put a cedar block in the pocket.  


I started this quilt a month ago when the statistics for coronavirus in our county of Mecklenberg, NC were 0.  Now the confirmed cases are 665 with 6 deaths.  There are presently 337,309 cases in the US and 1,289,380 in the world.  We've been told that these next two weeks will show a peak of cases here. I hope and pray that this moment in history leaves my family and friends untouched as we shelter in place at home ... and as I pick up a needle and thread and stitch some love into my world❣️


Thursday, March 5, 2020

THE FAIRY FROST TWILIGHT SKY QUILT 🧚‍♂️ 🧚‍♂️ 🧚‍♂️

The Fairy Frost Twilight Sky Quilt is a quilt pattern designed by Michael Miller Fabrics to feature their Fairy Frost fabric line. The fabrics actually sparkle like a fairy dusted them with a wee bit of fairy frost.  


I made this quilt for my great-niece, Gianna's, high school graduation present. She doesn't graduate until May but the fabrics are just so pretty I decided to make it early and tuck it away in the drawer till May or probably just send it off to her early.  

The pattern looks complicated but it's actually just two different blocks. Twenty-five of one block and one hundred and fifty-two of the other.  


Twenty Five of the first block done. 

One block down, one hundred and fifty one to go.


First you sew all the blocks together on point into a large diamond shape.


Then you just twist that diamond around into a square and trim off all the sticking out bits. 


You'll end up with little rectangles along the sides after you trim. 


Then it's time to put it on the longarm.  That's my favOrite part of quilting ❣️


Waiting for my backing.


I wanted to make this quilt soft so I used Quilter's Dream Orient Batting and didn't over quilt it.  


I used a stitch length of 9 and set my tension to 1.75 and the bobbin TOWA tension to 200.  I used Aurifil Monofilament on the top to stitch in the ditch and MicroQuilter #7017 in the bobbin.  I used a 90-14 Jeans needle to stitch with.  


Binding all set to go on the Binding Baby


While I was making this quilt my husband gifted me with a painting of a feather for my quilting room.  Isn't it gorgeous❣️


Then I used my fabric scraps to make a quilted drawstring bag to gift the quilt in.  


I loved making this quilt.  The sparkling colors are almost hypnotic.  I hope Gianna enjoys it.  It reminds me of her because she sparkles too!


Remember to pick up a needle and thread and sew some love into your world❣️


Saturday, February 1, 2020

THE ORANGE BLOSSOM QUILT 🍊🍊🍊


This is my second Orange Blossom Quilt.  I made the first one a couple of years ago and it was used as a napping quilt by one of the little boys that I watched.  I made that one on my 45 year old ELNA SU sewing machine, which has no throat space and the feed dogs don't lift, making it impossible to quilt, but quilt it I did. This time around I made this quilt for my sister-in-law, LOU LOU❣️ 


This quilt is fun and easy to make, especially since it comes with a stencil by Plum Easy Stencils and you use freezer paper to make it.  It's actually more like an art project and less like a quilt. I wanted to make a throw size quilt but the kit was short on material (tsk, tsk) and so my throw turned into a lap quilt.

This quilt took much longer to make than normal because I suffered from the dreaded ... QUILTUS INTERUPTUS.  Yep, first I got involved with the Quilter's Planner Challenges that started January 1'st and had to stop and make a quilt and do 31 photo challenges.  And guess what?  I WON!  I've posted snapshots below of 25 of the 31 challenge posts. I blogged about the Sampler Quilt in my last blog.


The Quilter's Planner Sampler Quilt Challenge


Then my son's dachshund puppy, Tesla Firefly, ate something that she shouldn't have (because dachshunds do that) and had to have emergency surgery to remove it along with 75% of her intestines.  So, for a week we went over to watch her during her recovery.  The good news is, that against the odds, she is doing amazing!


Tesla Firefly

Then I got a cold which makes me mad because I had survived two 12 hour trips in a car with my son and his wife who were sick and did not catch their flu, (which I think is a huge testament to the cabin filter/air system in a Mercedes) only to come home to two little boys with colds and not catch that.  Then my hubbie out of the blue came down with a cold two weeks later and, again, I did not catch it.  I was absolutely sure that I had safely come through the season without a sniffle! Right? BUT then, THEN I was in line at the grocery store, happily minding my own business and reading the National Enquirer's headlines, when the totally wretched man behind me sneezed all over me AND my groceries.  Sure enough, I came down with a cold.  This, THIS is why I advocate staying home and this, THIS is why I would happily be a hermit for the rest of my days in my little forest on the lake if only M&M's grew on trees and I never had to leave home to buy them.  


Then on the third day of my cold, and everyone knows the third day is the WORST ... I had JURY DUTY. I will spare you the miserable details. Yes, you're welcome.


Finally, FINALLY I got back to quilting, with only one row left to go! And my QUILTUS INTERRUPTUS was over!


The Orange Blossom Quilt is fun to make.  First you use the stencil and cut out templates from a roll of freezer paper.  You can buy expensive quilting paper for this or just drop into Walmart and buy the freezer paper that's right next to the tin foil and save oodles.    


In the above picture you can see the cut out templates.  I took those and ironed them onto my fabric and then trimmed around them.  Then I took a glue stick and glued the upper edges of both of the curved templates and folded them over.  Next, I glued one edge of the petal template.


Then I placed the smaller template of the two over the glued edge of the petal.  I carefully tore away the fabric from the freezer paper until it laid flat and then placed a pin at the bottom to hold it in place.  Then I sewed along the edge of the freezer paper, tore it off and pressed it open.  Then I glued the opposite edge of the petal template.


Next, I glued the larger of the two templates onto the petal and sewed it in the same manner as I did the smaller one.  Then I pulled off the paper from the petal.  Then you take your stencil and square up your fabric and draw around it to create your perfectly squared block.  Like I said, it's more like an art project than a quilt and it's fun and easy to do!


Then it was off to the longarm!  My favorite part of quilting!  I did very little quilting on this quilt.  It has a cotton/wool fluffy batting and I wanted it to be fluffy throughout.  I used rulers and went around the curves and squares.  


I used Glide in White for the top and Glide in Sky for the bobbin.  My tension was set at 3.5 and my stitch length was set at 10.  I used a 90/14 Topstitch needle.  


The binding all wrapped up on the binding baby.


Then I made the binding and bound the quilt while streaming "James May - Our Man In Japan" on Amazon.  I love his dry humor and it was very interesting to learn more about Japan's culture.  Then it was time to wake up my "Master Quilt Holder" from his nap and let him hold the quilt in the backyard for me to take a picture of it.


I journaled all about this quilt in my Quilter's Planner.  If you quilt, I highly recommend looking into this planner.  Just go to quilters planner.com


I also made a lined and quilted bag to gift the quilt in.  As, I didn't have enough fabric to even make the throw size of the quilt, I used some fabric that I had in my stash that was left over from the pillows and table runner that I had made using this same Orange Blossom pattern. I also used these as entries in the Quilter's Planner's Photo Challenges under Small Projects.


After my bout with Quiltis Interruptus I finally finished the quilt and sent it on it's merry way to Lou Lou!


Remember to pick up a needle and thread and sew some love into your world❣️

Wednesday, January 15, 2020

THE QUILTER'S PLANNER SAMPLER QUILT ✂️


For Christmas this year my husband gifted  me with The 2020 Quilter's Planner in my Christmas stocking.  


This blog has always been my way of journaling my quilts but then last year I spotted the Quilter's Planner on Instagram and thought I'd give it a try and so I put it on my Christmas list. I really thought I was just getting a planner to journal in, but boy was I wrong! The Quilter's Planner is so much more than just a planner.  It comes with its very own community, fun challenges sponsored by people in the quilting industry, a magazine filled to the brim with quilt patterns and a block of the month Sampler Quilt by Karen Lewis of Karen Lewis Textiles. 

 
Some of my Instagram posts for the Quilter's Planner Photo Challenges


You can join the Quilter's Planner online community of quilters either on Instagram or Facebook.  Any time you become part of a community you grow as an individual and you improve in your craft.  Everyone in this community graciously shares their tips, tricks and techniques along with their successes and failures.  Trust me, you can learn a lot more from your failures then you can from your successes! These online platforms weren't an option years ago and I think we grow exponentially because of them.  You also meet some of the nicest people who will bend over backwards to help you.  


I participated in the photo challenges on Instagram.  They were fun and easy to do.  But I have so many quilts on my "to do" list for the year that I wasn't going to participate in the Block of the Month quilt challenge. Then I changed my mind and thought I'd just make a few blocks and turn them into a quilted drawstring bag instead of a quilt.  But once I got going I was absolutely hooked.  


Planning out my quilt in the Quilter's Planner


I had just finished making a quilt using fabric from Giucy Giuce and I had a bunch of that amazing fabric left over so that's where I pulled my fabrics from.  I also had scrap batting and backing and so I did not have to get anything for this quilt. I did not follow the quilt layout exactly as it was shown.  I just have this thing where I like to put my own spin on things. I made nine blocks instead of twelve and picked the nine I liked best.


The pattern by Karen Lewis is easy to follow and the blocks are easy to make.  Once I was done with January's I immediately made February's and then March's.  What can I say?  I'm just not the sort of person who has UFO's laying around. (That's quilt speak for unfinished objects.) My personality is such that I have to see a thing through or it weighs on my mind.  I just don't deal well with mind clutter, so, instead of doing this quilt one block each month I sat down and finished it in one go.  


Once the quilt was assembled I put it on my longarm.  Quilting on my longarm is my favOrite part of quilting.  A pieced quilt top is colorful but it's also flat.  Once you quilt it you add a completely different layer to it and it changes into something else entirely.  I love rolling a quilt off of my longarm and seeing it for the first time. There is always this amazing transformation. For this quilt I used stitch in the ditch quilting, straight line quilting and some white Glide thread.  I also used two battings ... one Quilter's Dream wool and one Quilter's Dream Poly/Cotton.


I had fun making this quilt and I've had so much fun being a part of the Quilter's Planner community!  AND I totally love to journal about my quilts as I make them.  I use washi tape and stickers and fine tipped markers and colored pencils and decorate my pages as I journal my plans for each quilt, keep track of my progress as I go along and watch as I reach my goals!  If you're a quilter I highly recommend purchasing the Quilter's Planner.  Just visit their website ... quiltersplanner.com 

And remember to pick up a needle and thread and stitch some love into your world❣️